A Comprehensive Guide: How to Create an IRCTC Account Online
The Indian Railways Catering and Tourism Corporation, better known as IRCTC, has revolutionized the way people book train tickets in India. With the advent of online ticket booking, travelers no longer need to stand in long queues at railway stations or depend on travel agents. Instead, they can conveniently book their train tickets from the comfort of their homes or offices. To do this, you need to have an IRCTC account. In this comprehensive guide, we will walk you through the step-by-step process of creating an IRCTC account online.
Why Create an IRCTC Account?
Before we dive into the steps of creating an IRCTC account, let’s understand why having one is beneficial:
1. Convenience
Creating an IRCTC account allows you to book train tickets online, saving you the time and effort of visiting a railway station or booking through an agent. You can book tickets from anywhere with an internet connection.
2. Access to Discounts and Offers
IRCTC often provides special discounts and offers to its registered users. By having an account, you can take advantage of these promotions, potentially saving on your travel expenses.
3. Easy Cancellation and Refunds
With an IRCTC account, you can easily cancel your tickets online and request refunds if necessary. This is a far simpler process compared to canceling physical tickets.
4. Seat Selection
Through your IRCTC account, you can select your preferred seats or berths when booking tickets, ensuring a more comfortable journey.
Now that you understand the benefits, let’s proceed with the step-by-step instructions to create your IRCTC account.
Step 1: Visit the IRCTC Website
To start the process of creating an IRCTC account, open your web browser and go to the official IRCTC website. The URL for the website is https://www.irctc.co.in/.
Step 2: Click on “Register”
On the IRCTC homepage, you’ll find the “Register” button. Click on it to begin the registration process.
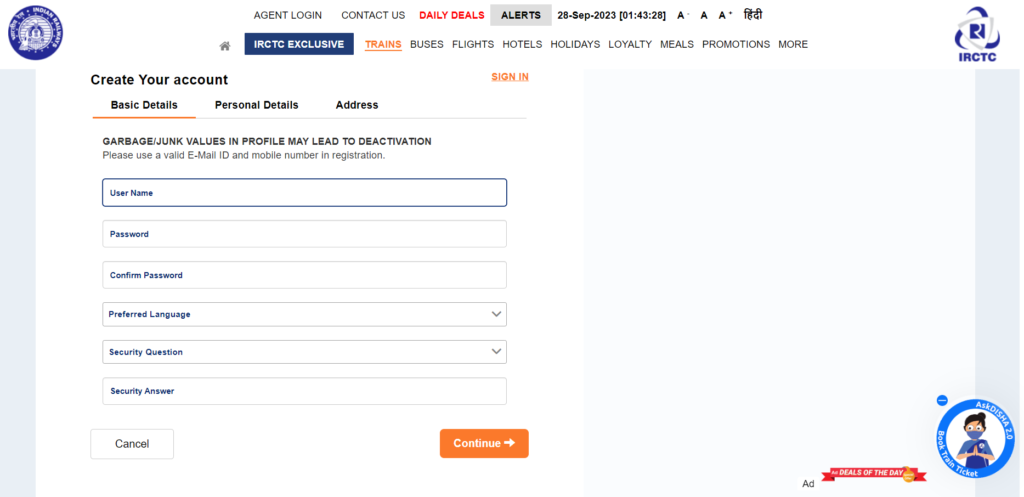
Step 3: Fill in the Registration Form
You will be redirected to the registration form. Here, you’ll need to provide various details to create your IRCTC account. The information required typically includes:
- Username: Choose a unique username for your IRCTC account. It can consist of letters, numbers, or a combination of both.
- Password: Create a strong password for your account. Ensure it contains a mix of uppercase letters, lowercase letters, numbers, and special characters for added security.
- Confirm Password: Re-enter the password you just created to confirm it.
- Security Question: Select a security question from the dropdown list and provide an answer. This will be used for account recovery purposes.
- Personal Details: Enter your full name, gender, marital status, and occupation.
- Date of Birth: Provide your date of birth in the format DD/MM/YYYY.
- Mobile Number: Enter your active mobile number. This number will be used for account verification and communication.
- Email ID: Provide a valid email address that you have access to. Your IRCTC account-related information and booking confirmations will be sent to this email.
- Nationality: Select your nationality from the dropdown list.
- Address: Enter your residential address, including the state and pin code.
- Aadhaar Number: Optionally, you can enter your Aadhaar number for easier identity verification. This step is not mandatory.
- ID Proof Type: If you don’t provide your Aadhaar number, you’ll need to select a valid ID proof type (e.g., passport, PAN card, voter ID, etc.) and provide the corresponding ID number.
Once you’ve filled in all the required information, double-check it for accuracy. Ensure that your mobile number and email address are correct, as you’ll receive an OTP (One-Time Password) for verification on these contact details.
Step 4: Enter the CAPTCHA and Accept the Terms
To verify that you’re not a robot, enter the characters displayed in the CAPTCHA image into the provided field.
After entering the CAPTCHA, carefully read the “Terms and Conditions.” If you agree to them, tick the box next to “I have read and accept the Terms & Conditions.” It’s important to understand and adhere to IRCTC’s terms and policies.
Step 5: Click on “Register”
Once you’ve completed all the necessary fields, and you’ve accepted the terms, click on the “Register” button to proceed.
Step 6: Verify Your Mobile Number and Email
After clicking “Register,” you’ll receive an OTP (One-Time Password) on the mobile number and email address you provided during registration. Enter the OTPs in the respective fields on the verification page.
Step 7: Account Successfully Created
If you’ve entered the correct OTPs, you’ll receive a confirmation message indicating that your IRCTC account has been successfully created. This message will also contain your user ID, which you’ll use to log in.
Step 8: Log In to Your IRCTC Account
Now that you’ve successfully created your IRCTC account, you can log in using your user ID and password. Simply click on the “Login” button on the IRCTC homepage and enter your credentials.
Step 9: Complete Your Profile
Upon logging in for the first time, you’ll be prompted to complete your profile. This includes adding passenger details and specifying your preference for services like meals, travel insurance, and more.
Step 10: Booking Tickets
With your IRCTC account ready, you can start booking train tickets. Simply enter your journey details, select your train, choose your class, and make the payment. Your booked tickets will be accessible through your account, and you can also check PNR status and make cancellations or modifications as needed.
Related Articles
- IRCTC Agent ID Registration and Price
- IRCTC Authorized Agent registration fee with RNFI
- Attention before getting IRCTC Authorised Agent ID Registration
- Paynearby Registration Charges
- Paynearby Commission Structure 2023 Update
Conclusion
Creating an IRCTC account online is a straightforward process that offers a multitude of benefits for Indian rail travelers. By following this comprehensive guide, you’ll have your IRCTC account up and running in no time, making train ticket booking and management a hassle-free experience. Enjoy the convenience of booking your train tickets from the comfort of your home and explore the diverse and vibrant landscapes of India with ease. Happy traveling!
Leave a Comment (0)
No comments yet
Be the first to comment!